Insulating a new home--
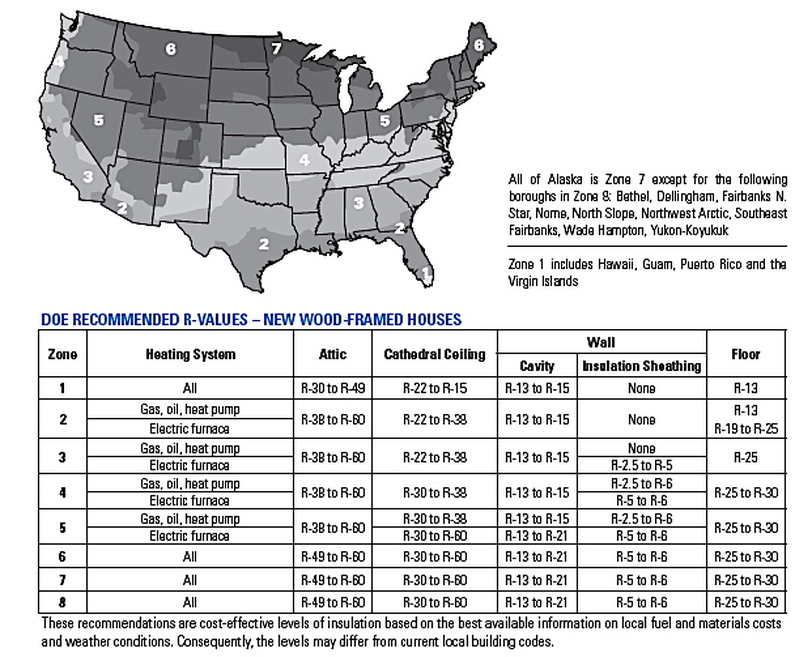
With all the energy loss facing the rest of your life (or someone else's) in a new home, it makes sense to insulate to an appropriate level as the building is constructed. No sense in setting up a future retrofit opportunity—insulation (and savings) will never be cheaper than they are at the time of construction. Additional information on insulation can be found in the insulation sub-menu of the Helpful Links page.
While some people look at "standards" as obtrusive regulatory mandates, this is not necessarily the case. They can be a helpful guide to the appropriate and efficient amount of insulating treatment. If all you've got is an understanding for absolute minimums or overboard maximums, there will be no opportunity to make a smart choice somewhere in-between. Is R-90 in your attic appropriate? Not really. Every additional inch or R-value of thermal protection is less cost effective than the previous one.
Standards can cut through the mystery for you. They can also help you do things you might not thermally understand but be glad you followed when you see your bills compared to your neighbors'.
U.S. Department of Energy, listings and details on types of insulation
Click on the images below to enlarge them
Slab-on-grade floors provide an inexpensive and versatile foundation
Slab-on-grade floors are often the least expensive foundation system and can expedite the construction process. The foundation consists of a concrete slab poured over at least 4 inches of gravel and a layer of 10-mil polyethylene. Virtually any floor covering works well with a slab, although wood flooring systems may require installation of wooden furring strips prior to attaching the wood flooring material.
Homes use slab-on-grade floors in two ways: either as the bottom floor of a home or as the floor in a daylight basement—where the floor level is about even with outside earth. Areas with mild winters do not require a deep foundation. In these regions, slab-on-grade foundations may prove an ideal choice for flat lots.
Adequate insulation of slab floors is often a construction element coming very early in the build. And because of that, enough planning for it (and it's specialized techniques) must happen in advance. A complete assortment of slab insulation techniques can be found at the Department of Energy's building energy codes area. Here is alinkto it. If you're benefitting from lower construction costs represented by a slab floor, perhaps that's a justification for spending adequate money on these specialized forms of edge insulation.
Click on the images below to enlarge them
The efforts above are aimed at preventing outside cold air from drawing heat out of the edge of the slab by conduction. The conductive pathway to the outside air is being stopped. Heat loss to the ground under the slab is minimal, in that most floors have some coverings, the slab itself has some resistance to heat passage (especially downward) and the differential of inside air temperature at the floor to the ground is far LESS than it is to outside freezing air through the edge of the slab.
NON-STANDARD WALL FRAMING TO MAXIMIZE INSULATION VALUE
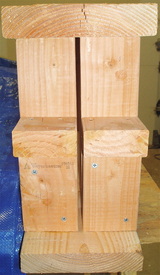
Wide plate, double offset stud technique
Wide plate, double offset stud technique
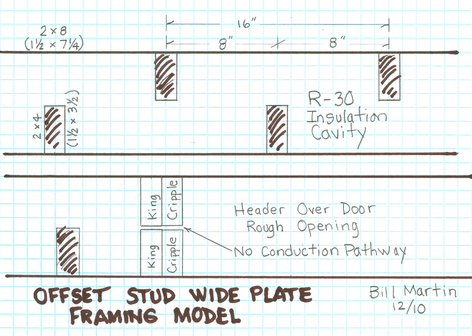
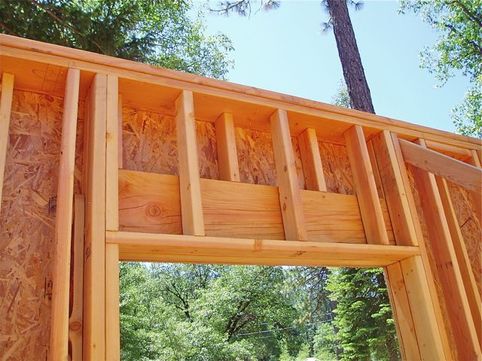
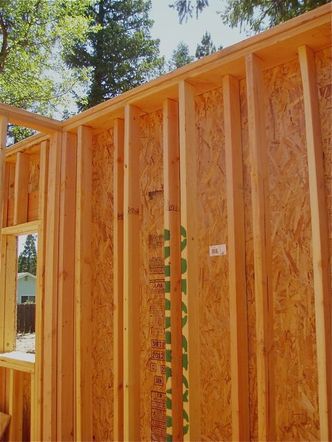
The framing method (below) illustrates a chance to stop the thermal conductivity path through wood framing to-from the outside wall and its influence by outside air. This is accomplished by using TWO sets of wall studs, 16" on center, but staggered or offset in their locations. When door or window penetrations of the wall are necessary, notice that the two studs do not touch each other.
With a 2 x 8 as the base and top plate, greater amounts of insulation can occupy this cavity. This method presents only minor adjustments for both framing and insulating contractors, and does not require separate, outside insulating sheathing to achieve an R-30 wall. This wall was blown with loose-fill JM Spider® and covered with 4-mil polyethylene.
With a 2 x 8 as the base and top plate, greater amounts of insulation can occupy this cavity. This method presents only minor adjustments for both framing and insulating contractors, and does not require separate, outside insulating sheathing to achieve an R-30 wall. This wall was blown with loose-fill JM Spider® and covered with 4-mil polyethylene.
Photo Gallery of perimeter wall insulation application
Click on images below for larger views plus caption. Use right arrow to advance to next image in close-up.
Click on images below for larger views plus caption. Use right arrow to advance to next image in close-up.
Insulation of Attics
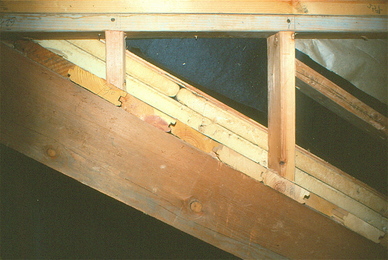
Plenty has been said in the section on the page named Building Efficiency. Attics should be well ventilated and offer a buffer space so that outside heat on the roof decking cannot reach interior space. However, sometimes the design calls for cathedral ceilings without much chance of insulating by typical means. This problem can be overcome by placing insulation on the OUTSIDE of roof decking. Below is an example of where this was done with two layers of thick, foam board insulation.
For vaulted ceilings created with individual rafters (and not scissor trusses), the preferred treatment is to create a baffled airway between the underside of roof decking and the top of the insulation treatment. When anything other than closed cell foam is used to insulate, such an airway connects eave air inlets with ridge peak outlets, providing a means to keep insulation media dry in summer and winter, lower the chances of dry rot under the decking, and cooling the underside of decking in hot weather.
Your Webmaster prefers scissor trusses (which can be built in a variety of pitches). They make for a larger buffered airspace in the attic; giving additional lag time before daily summer heat build-up. They also provide for a chance to install the greatest thickness of fiberglass batts.
Rigid foam (over) decking--
|
The view outbound from a retrofit attic dormer across the new roof surface. Building felt has already been nailed against the outside of the studs. House wrap can be seen (upper right) covering the outside of the felt. Flashing and shingles beyond are not seen.
Two layers of 1.5" aluminum-coated polyurethane foam board rests atop 2 x 6 " T & G pine. Plywood at the top of the assembly serves to anchor felt and shingles. The total R-value here is close to 19; not adequate by today's standards. This approach demonstrates how certain designs can compromise thermal possibilities. No pathway for cooling airflow is possible here. |
Loose Fill, Blow-in--
Loose fill blown attic products are best applied to flat ceilings, where it's easiest to "float" an even thickness of the product over the attic territory. Fiberglass blowing wool or cellulose are the most common. Each has the potential to eliminate gaps that could occur with flanged and stapled batt products, though with deep batts of R-30 or greater, this is less likely.
Below, please find a gallery of photos from a new blow-in application of fiberglass.
Below, please find a gallery of photos from a new blow-in application of fiberglass.
Photo Gallery of blown-in fiberglass application
Click on images below for larger views plus caption. Use right arrow to advance to next image in close-up.
Click on images below for larger views plus caption. Use right arrow to advance to next image in close-up.
In this house, the attic blown-in fiberglass to R-49 joins walls that were blown to R-30, and under-floor batts of R-30. The calculated maximum heat loss for this 3,265 sf home at a winter design temperature of +10°F is under 20,000 Btu/hr. This generous level of insulation permits a rather small, 3-ton ground source heat pump to be installed. It will run (nearly always) at 67% of full capacity, using under 1800 watts of power. Lower HVAC equipment capital cost and reduced power or fuel consumption with greater comfort—that's what insulation can do!
Energy consumption estimates for this house are found at the following link. The section is "Yearly Summary of Energy Use By Month." It is found with an orange heading, well down the page.
Energy consumption estimates for this house are found at the following link. The section is "Yearly Summary of Energy Use By Month." It is found with an orange heading, well down the page.
